
On-spout replacement
Select from these ShowerStart® Express Tub Spout offerings to replace a tub spout with its diverter located ON THE TUB SPOUT
View All

In-wall replacement
Select from these ShowerStart Express Tub and Shower System for In Wall Diverter offerings to replace a tub spout with its diverter located IN THE WALL.
- For “Push-Style” In-Wall Diverters please select from the above standard on-spout replacement options.
View All
Understanding the Mounting Options
Order your ShowerStart Express Tub and Shower System with mounts that match the type of plumbing you're connecting to
Configurations
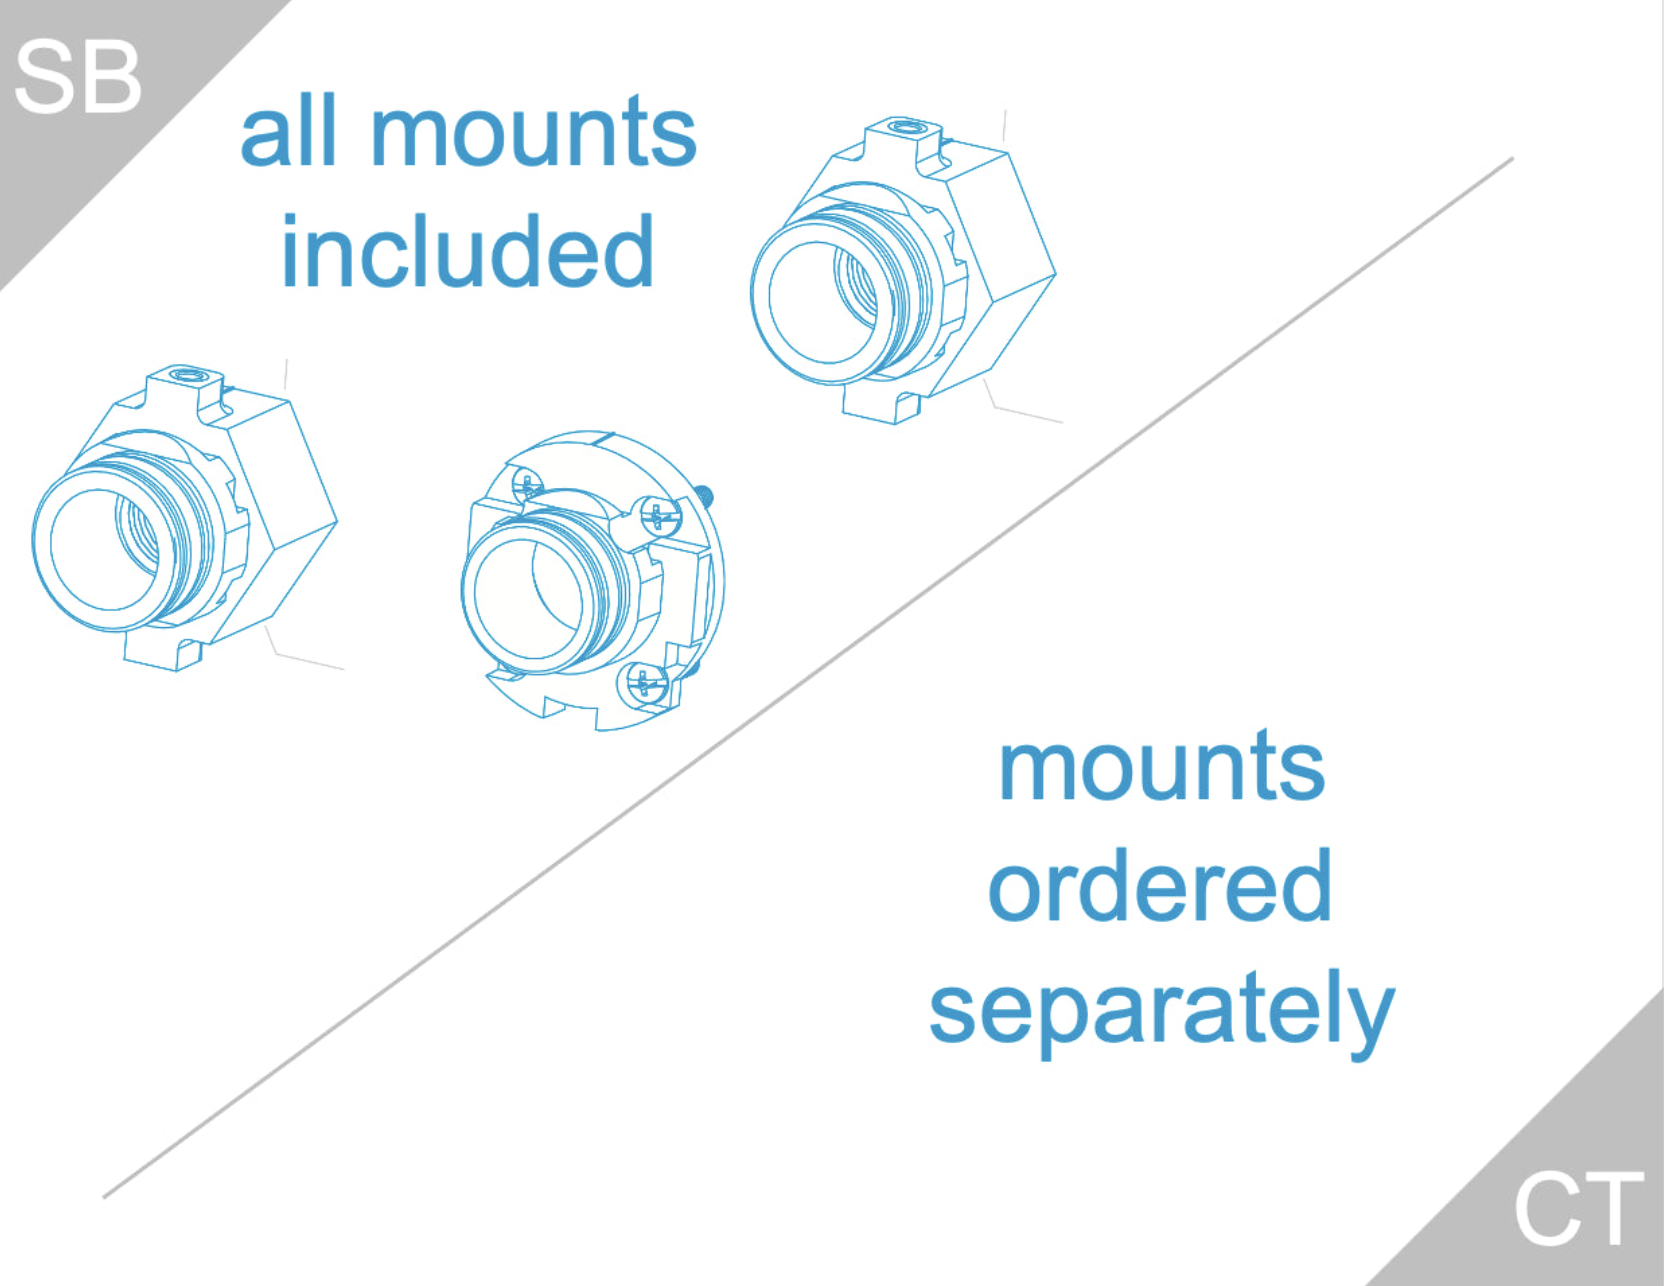
Part numbers end in SB or CT.
• SB: all mounts included
• CT: mounts ordered separately
• Ind. mounts sold in 9-packs
Slip-Fit Mount
Use on ½ in. non-threaded pipes:
• pipe length 1 ¼ - 1 ¾ in.
• copper, galvanized or CPVC
• PEX or CPVC with copper stub
½ in. Threaded Mount
Use on NPT threaded pipes:
• pipe length ⁷⁄₁₆ - ½ in.
• works with ½ in. galvanized
• works with ½ in. NPT adapters

¾ in. Threaded Mount
Use on NPT threaded pipes:
• pipe length ⁷⁄₁₆ - ½ in.
• works with ¾ in. galvanized
• works with ¾ in. NPT adapters
Watch the Installation Videos
Learn how to mount the ShowerStart Express Tub and Shower System using slip-fit and threaded connections
Field Install
Watch this video to review a in-field installation of the ShowerStart Express Tub and Shower System. Installing the System is a straightforward process and can be completed in just a few minutes.
Slip-Fit Install
This video provides an overview of using the ShowerStart Express Tub and Shower System's slip-fit connector. This connector is designed for use on non-threaded ½ in. copper and galvanized pipe.
Threaded Install
In this video we'll review how to install the ShowerStart Express Tub and Shower System on threaded plumbing. Mounts are available for both ½ in. and ¾ in. threaded galvanized pipes.
In-Wall Diverter Install
When installing the ShowerStart Express Tub and Shower System in a bathroom with an in-wall diverter, be sure to select the System for In-Wall Diverters product. Watch this install to learn more.
Additional Resources
Gather extra information and dive deeper into the ShowerStart Express Tub and Shower System
Installation Guides
Feasibility Check
Before installing the ShowerStart Express Tub and Shower System make sure it's compatible with the bathroom's plumbing dynamics and structure:
- Static Water Pressure: 35 psi or greater
- Tub Spout Water Supply Pipe Type:
- copper (1/2 in.) or
- galvanized (1/2 in. or 3/4 in.)
- PEX with copper stub (1/2 in.)/li>
- CPVC (1/2 in.) with or without copper stub
- Tub Spout Water Supply Pipe Length:
- 7/16 - 1/2 in. if using one of the ShowerStart Express Tub Spout Threaded Mounts
- 1 1/4 - 1 1/2 in. if using ShowerStart Express Tub Spout Slip-Fit Mount
- see individual Mount Options for detailed exceptions
- Tub Spout Water Supply Pipe Stability:
- secure, non-rattling
- secure, non-rattling
- Previous Shower Diverter Type:
- on-spout diverter
- in-wall diverter
Troubleshooting
Leaking:
Check below to learn more about the different types of leaks that may occur with an improper ShowerStart Express Tub and Shower System installation and fix them.
Showerhead Leak: A trickle of water (~ .1 gal./min.) will exit the showerhead or handshower after the hot water has been automatically diverted to it, but before the normal shower flow has been activated. This trickle is NORMAL and necessary for compliance with Uniform Plumbing Code certification.
Leak From Back Of Tub Spout or Hole In Bottom of Tub Spout: Leaking from either of these locations is typically a result of an installation issue. The Tub Spout should be dismounted and reinstalled.
Installation with slip-fit mount:
1. Ensure Pipe Surface Is Not Damaged
The pipe should be lightly sanded and wiped clean if heavily scratched or dirty.
2. Check The Slip-Fit Clamp
Fit with the pipe must be very secure. Clamp should NOT slide or rotate and Clamp Set-Screw should be as tight as possible. (The Set-Screw, only engages with the clamp and will not puncture the pipe when thoroughly tightened.)
3. Ensure Correct Seal Has Been Installed
Use tubular shaped seal for 1/2 in. copper and tapered ring shaped seal for 1/2 in. galvanized.
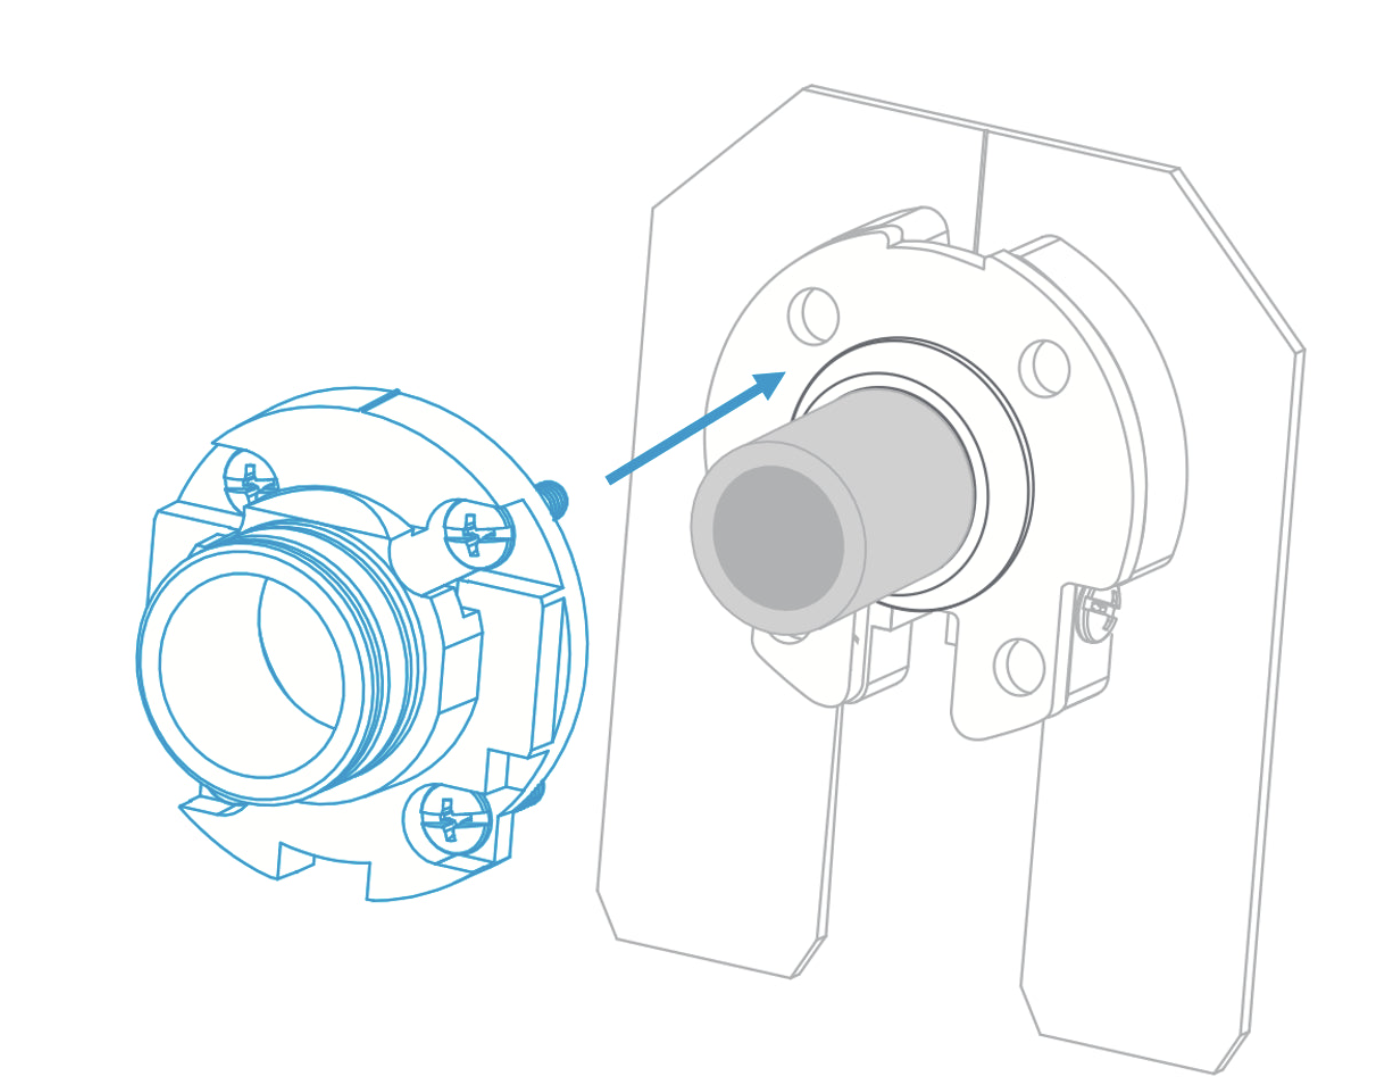
4. Slip-Fit Quick Connect Receiver Must Be Fully Tightened
Check that the 4 screws on the face of the Slip-Fit Quick Connect Receiver have been completely tightened. These screws compress the Seal. Always tighten in an "X" pattern as illustrated in the product Guide.
5. Inspect Slip-Fit Quick Connect Receiver O-Ring Seals
Inspect the two o-ring seals on the Slip-Fit Quick Connect Receiver. These seals should be clean and free from dirt, dust, hair. lint .... Wipe seals clean with a wet, lint-free cloth if necessary.
6. Install Tub Spout Gently
Install the Tub Spout gently so the aforementioned o-ring seals do not become damaged or twisted during install.
7. Do Not Overtighten Bottom Set Screw
The set-screw located on the bottom of the Tub Spout should be tightened until is snug. Do NOT over overtighten or apply excessive force.
Installation with slip-fit mount:
1. Inspect The Threaded Quick Connect Receiver O-Ring Seals
Inspect the two o-ring seals on the Threaded Quick Connect Receiver. These seals should be clean and free from dirt, dust, hair. lint .... Wipe seals clean with a wet, lint-free cloth if necessary.
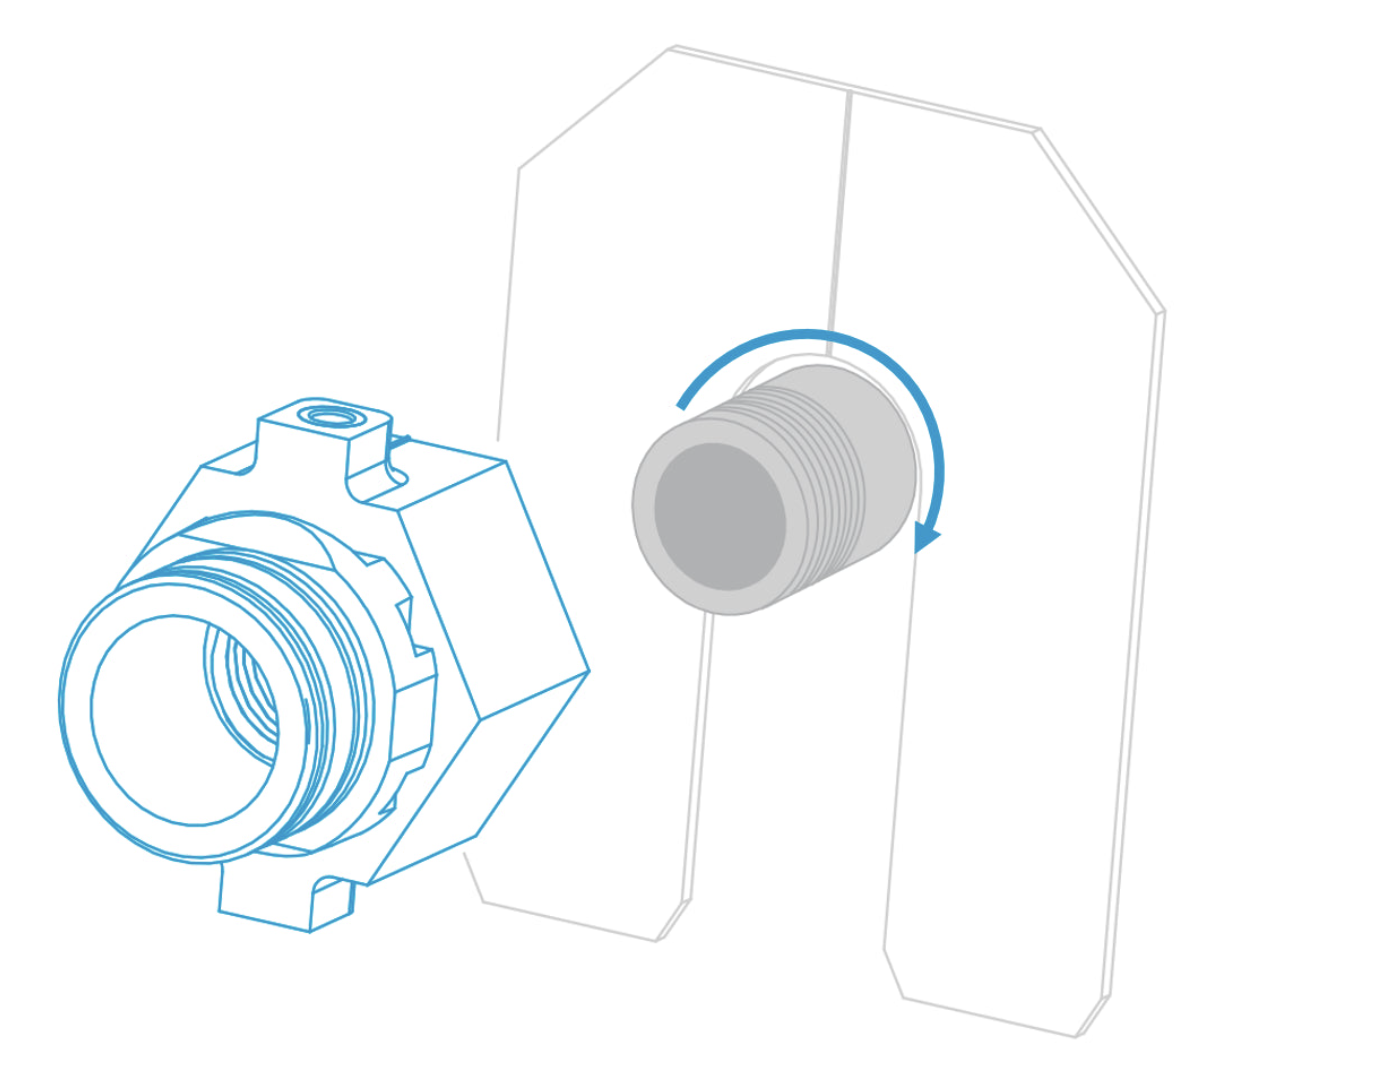
2. Ensure Pipe Threads Are Not Damaged
Remove any existing plumber's tape from the pipe threads and reapply about 4 wraps before reinstalling the Threaded Quick Connect Receiver. If the Threaded Quick Connect Receiver cannot be rotated so one of the two small brass inserts are positioned on the top of the Receiver, adjust the amount of plumber's tape being used.
Leak From Normal Tub Spout Outlet
Two different types of leaks can occur from the Tub Spout's outlet.
The first type causes the Tub Spout to leak continually and occurs due to a faulty mixing valve.
1. Ensure Water Is Completely Turned-Off At Mixing Valve or Hot/Cold Controls
After turning-off the water, allow the residual water remaining in the Tub Spout to drain and the Tub Spout to dry-out. If, after this period, the Tub Spout still leaks, the mixing valve/water controls will need to be replaced.
The second type of leak occurs while showering and is due to a faulty thermostatic Tub Spout seal.
1. Check Internal Tub Spout Seal
With hot water flowing through the Tub Spout, open and close the Tub Spout Outlet by pulling its diverter forward and then pushing it back. Repeat this cycle 5 times. If a seal cannot be formed, remove the unit and return it to Evolve for a Warranty Return.
Cold Water At Showerhead or Handshower:
Is the showerhead or handshower only dispensing cold water? There are a few reasons this could occur. Read below to learn more.
1. Don't Pull Tub Spout Diverter
The Tub Spout Automatically diverts hot water to the showerhead or handshower once it arrives. Pulling the diverter forward prior to that event will prematurely send water to the showerhead and that water will, at first, be cold.
2. Handshower Takes A Little Longer To Get Warm
A handshower will typically have residual cold water residing in its hoseline. This cold water must clear the line before hot water can begin exiting the handshower. As a result, there may be a second or two of cold water to release after the cord has been pulled. This situation occurs when stepping into the shower shortly after hot water has been diverted to the handshower and it begins to trickle.
Showerhead or Handshower Won't Flow When Activated:
There are three situations where the showerhead or handshower may not run after pulling the cord to resume normal flow.
1. Hot Water Has Not Yet Arrived
Hot water is automatically diverted to the showerhead or handshower after it reaches the tub spout. If the showerhead cord is pulled or the handshower button is pressed prior to this event, water will not flow from the shower because it has not been sent there yet. Pull the cord or press the button only after flow from the Tub Spout has been thermostatically shut-off and diverted.
2. Pause Spray Setting Has Been Selected
Our multifunction showerheads and handshowers come with a pause spray setting that allows bathers to reduce the flow of water to a trickle while shampooing, conditioning or lathering-up. Make sure the showerhead or handshower is in the full-body spray or massage spray setting for normal flow to occur.
3. In-Wall Diverter Blocks Flow To Shower
In-wall diverter valves should always be used in conjunction with ShowerStart Express Tub and Shower System for In Wall Diverters. The standard ShowerStart Express Tub and Shower System is not compatible with bathrooms containing in-wall diverters. When using the ShowerStart Express Tub and Shower System for In Wall Diverters, the in wall-wall diverter should always be set to direct water to the Tub Spout.
4. Former Showerhead Washer Blocking ShowerStart Express Tub and Shower System Showerhead Flow
Many showerheads come with a rubber washer located at the showerhead inlet. This washer is used to seal the connection between the showerhead and the shower arm, thereby preventing leaks. When removing the old showerhead this rubber washer, can become lodged on or inside the shower arm. Then, when the ShowerStart Express Tub and Shower System showerhead is placed on the shower arm, the washer from the former showerhead obstructs flow to the ShowerStart Express Tub and Shower System showerhead. To fix this problem remove the ShowerStart Express Tub and Shower System showerhead, check for the presence of the residual washer (check inside and on the lip of the shower arm), remove the washer if present, and replace the ShowerStart Express Tub and Shower System showerhead.
1/2 in. Threaded Galvanized Pipe Is Longer Than Recommended Pipe Length:
Upon removing the prior tub spout, its common to find a threaded 1/2 in. galvanized pipe that's longer than the recommended pipe length (7/16 - 1/2 in.). In this situation the easiest way to mount the ShowerStart Express Tub Spout is to cut the 1/2 in. galvanized pipe down and use the Slip-Fit Mount. With this method, the 1/2 in. threaded galvanized pipe becomes a non-threaded galvanized pipe.
The Slip-Fit Mount can be used on non-threaded pipe (copper or galvanized) that is 1 1/4 - 1 3/4 in. long. It comes with a Spacing Tube to provide the ideal measurement of 1 1/2 in. long. Follow the process below to use the Slip-Fit Mount on 1/2 in. galvanized pipe.
- Slip the Spacing Tube over the 1/2 in. galvanized pipe
- Mark the end of the Tube with a pencil
- Cut the 1/2 in. galvanized pipe at the mark.
- The pipe threads are now removed and the Slip-Fit mount can be placed on the pipe.